Minkee Reverse Applique Tutorial
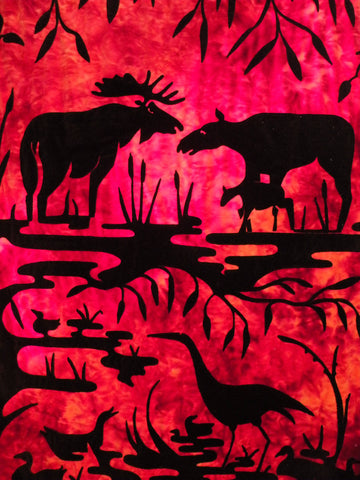
This brilliant quilt is Minkee, velvety dense color, and soooooooooooooooooo touchable.
To make this quilt, I enlarged the continuous line designs that put the moose family in the swamp under willow tree branches, and enlarged the continuous line designs that put the crane and ducks in the pond. I made sure both were closed-loop designs, meaning no start, no stop, for each of the two patterns.
Both designs then were traced by hand with a Sharpie pen (that tip they call fine point but its really fairly big), onto a 47 wide x 84" long sheet of Dissolve (from Superior Threads). The border between the two is shapely, so it doesn't appear to be a border. I left enough room at the out edges of Dissolve to be able to pin them securely to the quilt.
Dissolve is the same material as Solvy (from Sulky), so if you try this in a size that fits the Solvy size limit of 19" wide, that sure works too.
I longarm quilted the designs through the Dissolve pattern, which was pinned in place to three layers of Minkee (a stretchy flattened polyester velvet from Benartex). Each Minkee layer was full width, about 63", and over 2 and a half yards long.
Two layers, the black and the tonal red, faced upward against the Dissolve. The third layer, plain red, faced downward, to be the cozy back side of the quilt.
Longarm quilting means I pinned the Minkee layers to the rollers of the huge machine, and drove the quilting machine over my pattern lines, following them freehand.
The outer edges, forming a 6 inch border wider than my pattern, were then quilted for interest and structural integrity. You don't see that black border in the photograph, my apology, I wanted the artwork to be larger.
When done with the quilting-machine work, I unpinned the quilt, picked off the large pieces of Dissolve and discarded them, and cut away the black layer of Minkee, to reveal the tonal red background. I stayed over an eighth of an inch from the stitching lines, because the flat velvet nap of the Minkee needs it.
All that cutting is with very sharp scissors, patience - since the velvet slips out of the scissor blades, and a small shop vacuum next to me for frequent vacuuming of the velvet lint that falls out.
At the outer edges, I did a straight sewing machine stitch to join the three layers, about an inch inside of the selvedges and cut edges top and bottom. Those edges were later trimmed to within half an inch of the straight line stitching, forming a velvet raw-edge hem, very snuggly to cuddle.
Tossing the quilt into the dryer to knock off the velvet lint was the first step in finishing, then a trip through the washing machine to finish that job and to fluff it up, and again through the dryer. If you don't do the first dryer step, the velvet lint will quickly clog the washing machine filter and cause an overflow of water.
Give it a try - you can always come use my longarm machine and "take a class" in this process, making your own quilt with me.